[py2exe] "ImportError: No module named xlsxwriter" 이런 Error


py2exe를 사용해서 xlsxwriter를 사용한 소스를 exe 파일로 만들어 실행시킬 때, 아래와 같은 Error를 만나는 경우가 있다.


ImportError: No module named xlsxwriter


아래 폴더 위치 아래 "xlsxwriter"라는 폴더가 있는지 확인해 본다


C:\Python27\Lib\site-packages


아마도 "xlsxwriter"라는 폴더가 없을 것입니다. 

"xlsxwriter"를 설치할 때, 아래 파일만 설치되고, "xlsxwriter" 폴더가 만들어지지 않는 경우가 있는 것 같네요.


XlsxWriter-0.8.7-py2.7.egg


이유는 잘 모르겠지만, XlsxWriter-0.8.7-py2.7.egg를 압축을 풀면, "xlsxwriter" 폴더가 생깁니다.


이제 다시 py2exe를 사용해서 exe 파일을 만들어서 해 보세요!!!

반응형


[파이썬, Python] 리스트 기초 (배열)


예제1. 빈 리스트 만들기

>>> a = [ ]

>>> a

[ ]


예제2. append를 이용한 리스트 추가 하기

>>> a.append(1)

>>> a

[1]

>>> a.append("ABC")

>>> a

[1, 'ABC']


예제3. + 연산자를 이용한 리스트 추가

※ "DEF"와 ["GHI"]가 다른 방식으로 추가 되기 때문에 주의를 할 필요가 있습니다.


>>> a += "DEF"

>>> a

[1, 'ABC', 'D', 'E', 'F']

>>> a += ["GHI"]

>>> a

[1, 'ABC', 'D', 'E', 'F', 'GHI']


예제4. instert를 이용해 리스트 끼워넣기

※ 아래는 2번째 인덱스에 'TEST'를 끼워 넣은 예제입니다.


>>> a.insert(2, 'TEST')

>>> a

[1, 'ABC', 'TEST', 'D', 'E', 'F', 'GHI']


예제5. remove를 이용해 삭제하기

※ 리스트에 없는 것을 지우려고 하면 Error가 발생합니다. 

 "DEF"가 "D", "E", "F"가 각각 추가된 상태라서, "DEF"를 지우려고 하니깐 Error 발생!!!


>>> a.remove('DEF')

Traceback (most recent call last):

  File "<stdin>", line 1, in <module>

ValueError: list.remove(x): x not in list

>>> a.remove('D')

>>> a

[1, 'ABC', 'TEST', 'E', 'F', 'GHI']


예제6. pop을 이용해 맨 마지막 삭제하기

※ pop은 꺼내온다는 의미가 포함되어 있기 때문에, 맨 마직막 리스트가 return 됨을 알 수 있네요.


>>> a.pop()

'GHI'

>>> a

[1, 'ABC', 'TEST', 'E', 'F']

>>> a.pop(2)

'TEST'

>>> a

[1, 'ABC', 'E', 'F']


예제6. pop을 이용해 인덱스 값을 꺼내오면서 삭제하기

>>> a.pop(2)

'TEST'

>>> a

[1, 'ABC', 'E', 'F']


예제7. len을 이용해서 크기 구하기 

>>> a

[1, 'ABC', 'E', 'F']

>>> len(a)

4


예제8. index를 이용해서 찾기

>>> a

[1, 'ABC', 'E', 'F']

>>> a.index('E')

2


예제9. count

>>> a.count('A')

0

>>> a.count('ABC')

1


예제10. sort, reverse 등도 있네요. 

>>> a.reverse()

>>> a

['F', 'E', 'ABC', 1]

>>> a.sort()

>>> a

[1, 'ABC', 'E', 'F']


예제11. extend는 append와 비슷하지만 약간 다릅니다. 주의해서 사용하세요!!!

>>> a.extend("TEST")

>>> a

[1, 'ABC', 'E', 'F', 'T', 'E', 'S', 'T']

>>> a.append("TEST")

>>> a

[1, 'ABC', 'E', 'F', 'T', 'E', 'S', 'T', 'TEST']


※ 리스트와 비슷한 것으로 튜플(tuple)과 집합(set), 사전(Dictionary) 등이 있습니다.


반응형

[파이썬, Python] Wave 파일을 PCM 파일로 바꿔 저장하는 예제 4.


예제 3에서 약간 변경해서, stereo wav 파일일 경우에, left channel만 취해서 pcm 파일로 만드는 예제로 변경해 보았습니다.


#!/usr/bin/python

import sys

import os.path


ext = None


def convert_wave_to_pcm(filename):

file = open(filename, 'rb')

byteBuffer = bytearray(file.read())

file.close()


fn_ext = os.path.splitext(filename)

if fn_ext[1] == '.wav':

out_filename = fn_ext[0] + '.pcm'

else:

out_filename = fn_ext[0] + fn_ext[1] + '.pcm'

print 'Out file name: %s' % out_filename

out_file = open(out_filename, 'wb')

for x in range(44, byteBuffer.len(),4):

out_file.write(byteBuffer[x:x+1])

out_file.close()


if len(sys.argv) is 1:

YesNo = raw_input('Do you want to convert *.wav to *.pcm? (Yes or No): ') # There is no option.

if 'yes' in YesNo:

filename = '.wav'

print('Convert *.wav to *.pcm !!!')

else:

print('Please try it again with a filename or .wav !!!')

exit(0)

else:

filename = sys.argv[1]


while True:

fn_ext = os.path.splitext(filename)

if (not fn_ext[1]) & fn_ext[0].count('.'):

if fn_ext[0] == '.':

print 'Input file name is invalid!!!'

exit(0)

else:

print 'Input file name has the only ext!!!'

ext = fn_ext[0]

break

else:

try:

convert_wave_to_pcm(filename)

break

except:

print '[Error] No such file: %s' % filename

filename = raw_input('Please type file name: ')


if ext is not None:

folder = os.getcwd()

print 'folder: %s' % folder

for path, dirs, files in os.walk(folder):

convert_wave_to_pcm(os.path.join(path, filename)) for filename in files if filename.endswith(ext)


raw_input('Press Enter to exit')

exit(0)


wave2pcm_stereo2mono.py


[내 블로그 관련글]


반응형


[파이썬, python] 한글 (UTF-8) 지원하기


파이썬에서 한글(UTF8) 때문에 문제가 발생한다면 아래와 코드를 추가해보세요.


#-*- coding: utf-8 -*-


import sys


reload(sys)

sys.setdefaultencoding('utf-8')


반응형


[파이썬, python] 바이너리 파일 만들기


파이썬으로 바이너리 파일을 만드는 간단한 예제입니다. 

2byte little-endian 형식으로 1, 0, -1, 0을 40000번 판복해서 저장하기 위한 예제입니다. 

(amplitude가 1인 삼각파형 오디오 파일 만드는 예제입니다.)


import os.path


byteBuffer = bytearray([1,0,0,0,255,255,0,0])


out_file = open('binaryfile.dat', 'wb')

for x in range(0,40000):

out_file.write(byteBuffer)

out_file.close()


struct.pack을 사용해서, 2byte little-endian 형식으로 좀 더 보기 좋게 개선한 예제입니다.


import os.path

import struct


#byteBuffer = bytearray([1,0,0,0,255,255,0,0])

byteBuffer = struct.pack('hhhh',1,0,-1,0)


out_file = open('binaryfile.dat', 'wb')

for x in range(0,40000):

out_file.write(byteBuffer)

out_file.close()


generate_tone.py


반응형


[파이썬, Python] py2exe로 실행파일 만들기


Python으로 여러가지 편리한 툴을 만들어 쓰면, 굉장히 편리한 경우가 많죠!

Python 소스 상태로 사용할 경우의 장점은 OS에 무관하게 쓸 수 있다는 장점이 있죠.


하지만, Python이 설치되어 있지 않은 환경에서는 사용할 수 없다는 단점이 있습니다.

그리고, Python 소스에서 특정한 라이브러리를 include하였을 경우에는, 사용하려는 환경의 Python에도 동일한 라이브러리가 설치되어 있어만 한다는 단점이 있습니다.


이러한 단점을 보완하기 위해서, windows 환경을 사용하는 사람들끼리는 Python 소스를 exe 파일로 만들어서 제공하는 방법이 있습니다.

Python 소스를 exe로 만들 때, 가장 많이 사용하는 것이, py2exe입니다.


[py2exe 다운로드 및 설치]


우선, 아래 Link로부터 설치파일을 받아서 py2exe 설치를 합니다.


PC에 Python2.7 이 설치되어 있다면, "py2exe-0.6.9.win32-py2.7.exe"을 받습니다.

(만약 PC에 Python2.5가 설치되어 있다면, "py2exe-0.6.9.win32-py2.5.exe"를 받으면 됩니다.)


다운로드 받은 설치 실행 파일을 실행시켜서, "다음 (Next)"만 클릭하면 손쉽게 설치가 됩니다.


[py2exe 사용법]


1. setup.py 생성


다음과 같은 setup.py 를 하나 만듭니다. 아래 예제에서 exe로 만들 파일이름은 "test.py"입니다.


from distutils.core import setup

import py2exe, sys, os


includes  = [

 "encodings",

 "encodings.utf_8",

]


options = {

 "bundle_files": 1,                 # create singlefile exe

 "compressed": 1,                 # compress the library archive

 "optimize": 2,                 # do optimize

 "includes": includes,

}


setup(

 options = {"py2exe" : options},

 console = [{'script': "test.py"}],

 zipfile = None,

)


2. setup.py 실행


아래와 같이 setup.py를 실행시키면, exe파일이 dist 폴더 아래에 생성됩니다.


python setup.py py2exe


3. 기타


위의 예제 setup.py를 실행하면, 아래와 같은 경고문구가 발생합니다. 


*** binary dependencies ***

Your executable(s) also depend on these dlls which are not included,

you may or may not need to distribute them.


Make sure you have the license if you distribute any of them, and

make sure you don't distribute files belonging to the operating system.


   WSOCK32.dll - C:\Windows\system32\WSOCK32.dll

   USER32.dll - C:\Windows\system32\USER32.dll

   ADVAPI32.dll - C:\Windows\system32\ADVAPI32.dll

   SHELL32.dll - C:\Windows\system32\SHELL32.dll

   KERNEL32.dll - C:\Windows\system32\KERNEL32.dll


4. dll_excludes 옵션


아래 예제와 같이, dll_excludes 옵션을 사용하면 *.dll 파일이 포함되지 않도록 할 수 있습니다.


from distutils.core import setup

import py2exe, sys, os


includes  = [

"encodings",

"encodings.utf_8",

]


options = {

 "bundle_files": 1,                 # create singlefile exe

 "compressed"  : 1,                 # compress the library archive

 "optimize"    : 2,                 # do optimize

 "dll_excludes": ["WSOCK32.dll", "USER32.dll", "ADVAPI32.dll", "SHELL32.dll", "KERNEL32.dll"],

 "includes": includes,

}


setup(

 options = {"py2exe" : options},

 console = [{'script': "test.py"}],

 zipfile = None,

)


5. 예제 파일 첨부


setup.py


6. 기타 옵션


Using "bundle_files" and "zipfile"

An easier (and better) way to create single-file executables is to set bundle_files to 1 or 2, and to set zipfile to None. This approach does not require extracting files to a temporary location, which provides much faster program startup.


Valid values for bundle_files are:

3 (default)

don't bundle

2

bundle everything but the Python interpreter

1

bundle everything, including the Python interpreter


If zipfile is set to None, the files will be bundle within the executable instead of library.zipNote: you will still be required to include the MSVC runtime DLL with your application, which should be located in the dist directory along side the executable (named MSVCRXX.dll, where XX = revision number).


Here is a sample setup.py:

Toggle line numbers
   1 from distutils.core import setup
   2 import py2exe, sys, os
   3 
   4 sys.argv.append('py2exe')
   5 
   6 setup(
   7     options = {'py2exe': {'bundle_files': 1}},
   8     windows = [{'script': "single.py"}],
   9     zipfile = None,
  10 )

(출처: http://www.py2exe.org/index.cgi/SingleFileExecutable) 

반응형

[파이썬, Python] 하위 폴더를 포함한 파일 리스트 출력하기 예제 2.


os.walk를 이용한 예제에서 출력 file 명 형식을 약간 바꿔보았습니다. 

현재 folder를 기준으로 하위 폴더명만을 포함한 파일명을 나열하도록 수정했습니다. (실행 결과 참조)


#!/usr/bin/python

import os.path


folder = os.getcwd()

print 'Current folder : %s' % folder


for path, dirs, files in os.walk(folder):

    print '\nFolder: ', path

    if files:

    sub_path = path[len(folder)+1:]

        for filename in files:

            print ' Files: ', os.path.join(sub_path, filename)


exit(0)


실행 결과:

D:\myPython>python filelist2.py

Current folder : D:\myPython


Folder:  D:\myPython

 Files:  example.py

 Files:  fileList2.py


Folder:  D:\myPython\folder1

 Files:  folder1\1.wav


Folder:  D:\myPython\folder1\folder11

 Files:  folder1\folder11\11.wav

 Files:  folder1\folder11\111.wav


Folder:  D:\myPython\folder1\folder12


Folder:  D:\myPython\folder2

 Files:  folder2\2.wav


os.walk에대한 좀 더 자세한 내용은 아래를 참고 하세요.

https://docs.python.org/2/library/os.html#os.walk


fileList4.py


반응형

[파이썬, Python] XlsxWriter 설치 및 엑셀 출력 예제 (윈도우즈 환경)


Python에서 출력 결과를 엑셀로 만드는 방법은 여러가지가 있습니다.

구글링을 해보니... XlsxWriter를 사용하는 것이 좋다는 의견들이 있어서... 

XlsxWriter를 설치해서 사용해 보기로 했습니다. ^^


첫번째, 파일 내려받기

GitHub에 XlsxWriter Zip 파일 내려받기


위의 싸이트에 가서, 아래 그림처럼 Zip 파일을 내려 받습니다. 


두번째, install 하기

내려 받은 Zip 파일을 압축을 푼 다음, 아래와 같이, setup.py를 이용하여 install을 합니다.


C:\XlsxWriter-master>python setup.py install


세번째, 엑셀(Excel) 파일 출력 예제 해보기

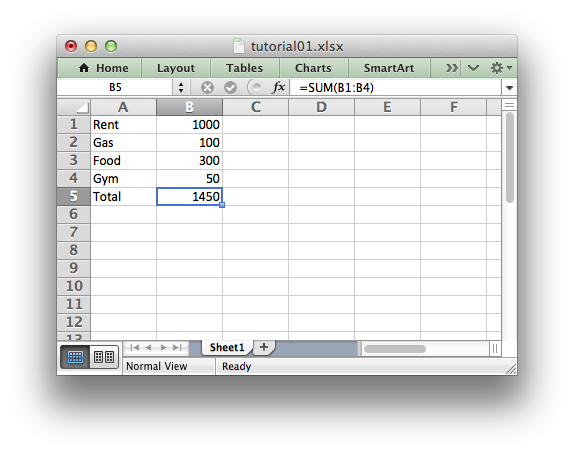
XlsxWriter 싸이트에서 제공하는 아래 기본 예제를 카피하여 excel_test.py로 저장한 후에 실행 시켜 보니, 

예제에 있는 그림처럼 엑셀 파일 만들짐을 확인 할 수 있네요... (아래에 예제 파일 첨부했습니다.)


오~~~ 너무너무 쉽네용 ^^ 진작에 해 볼걸 그랬네요... ^^


<예제 파일> 

excel_test.py


import xlsxwriter

# Create a workbook and add a worksheet.
workbook = xlsxwriter.Workbook('Expenses01.xlsx')
worksheet = workbook.add_worksheet()

# Some data we want to write to the worksheet.
expenses = (
    ['Rent', 1000],
    ['Gas',   100],
    ['Food',  300],
    ['Gym',    50],
)

# Start from the first cell. Rows and columns are zero indexed.
row = 0
col = 0

# Iterate over the data and write it out row by row.
for item, cost in (expenses):
    worksheet.write(row, col,     item)
    worksheet.write(row, col + 1, cost)
    row += 1

# Write a total using a formula.
worksheet.write(row, 0, 'Total')
worksheet.write(row, 1, '=SUM(B1:B4)')

workbook.close()

_images/tutorial01.png

(출처: https://xlsxwriter.readthedocs.org/tutorial01.html)


<예제 파일 2> 


line_chart.py


#######################################################################
#
# An example of creating Excel Line charts with Python and XlsxWriter.
#
# Copyright 2013-2016, John McNamara, jmcnamara@cpan.org
#
import xlsxwriter

workbook = xlsxwriter.Workbook('chart_line.xlsx')
worksheet = workbook.add_worksheet()
bold = workbook.add_format({'bold': 1})

# Add the worksheet data that the charts will refer to.
headings = ['Number', 'Batch 1', 'Batch 2']
data = [
    [2, 3, 4, 5, 6, 7],
    [10, 40, 50, 20, 10, 50],
    [30, 60, 70, 50, 40, 30],
]

worksheet.write_row('A1', headings, bold)
worksheet.write_column('A2', data[0])
worksheet.write_column('B2', data[1])
worksheet.write_column('C2', data[2])

# Create a new chart object. In this case an embedded chart.
chart1 = workbook.add_chart({'type': 'line'})

# Configure the first series.
chart1.add_series({
    'name':       '=Sheet1!$B$1',
    'categories': '=Sheet1!$A$2:$A$7',
    'values':     '=Sheet1!$B$2:$B$7',
})

# Configure second series. Note use of alternative syntax to define ranges.
chart1.add_series({
    'name':       ['Sheet1', 0, 2],
    'categories': ['Sheet1', 1, 0, 6, 0],
    'values':     ['Sheet1', 1, 2, 6, 2],
})

# Add a chart title and some axis labels.
chart1.set_title ({'name': 'Results of sample analysis'})
chart1.set_x_axis({'name': 'Test number'})
chart1.set_y_axis({'name': 'Sample length (mm)'})

# Set an Excel chart style. Colors with white outline and shadow.
chart1.set_style(10)

# Insert the chart into the worksheet (with an offset).
worksheet.insert_chart('D2', chart1, {'x_offset': 25, 'y_offset': 10})
workbook.close()


(출처: http://xlsxwriter.readthedocs.org/example_chart_line.html?highlight=line%20chart)


[Chart 관련 자세한 옵션] : Chart Class : http://xlsxwriter.readthedocs.org/chart.html?highlight=tick%20mark


반응형

+ Recent posts